柱状图和箱线图的代码能理解了其实发现好多作图都是可以触类旁通的,小提琴图作为科研结果常用展示图也不可或缺,用ggplot或者vioplot。
library("vioplot")
#准备数据
ToothGrowth$dose <- as.factor(ToothGrowth$dose)
p <- ggplot(ToothGrowth, aes(x=dose, y=len)) +
  geom_violin(trim=T) #T改为F即完整的小提琴图
p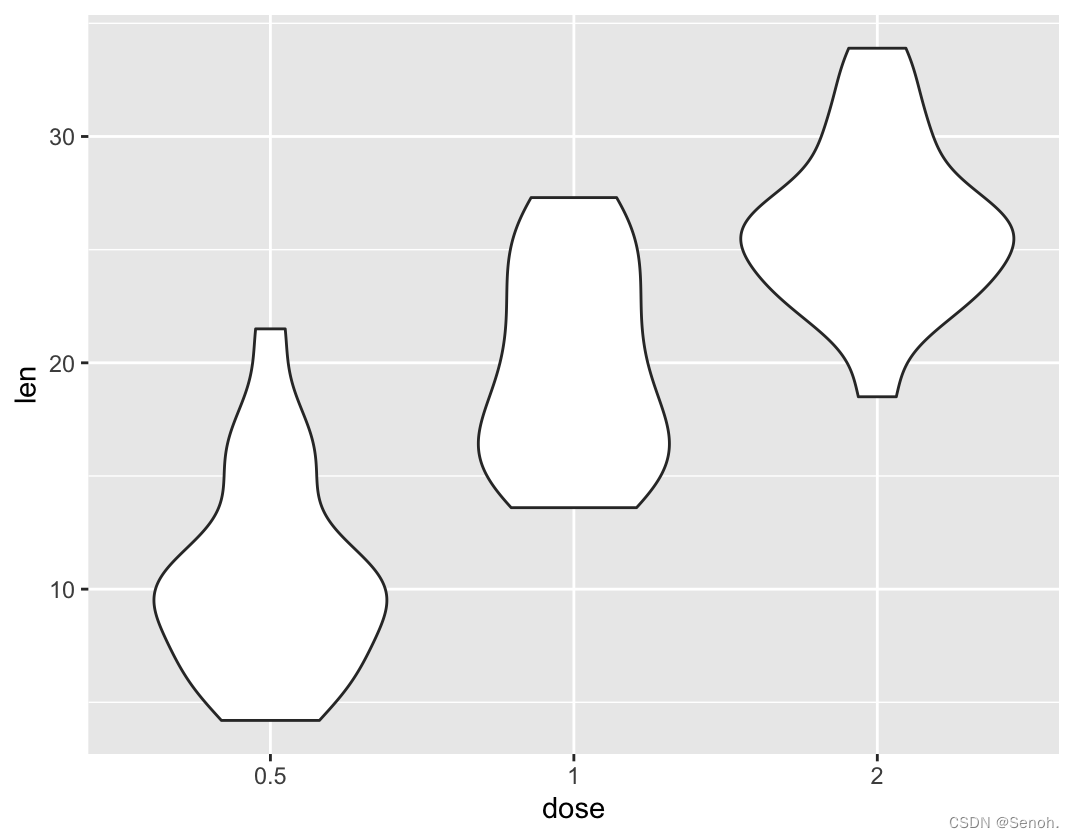
#选择需要显示的x项
p + scale_x_discrete(limits=c("0.5", "2"))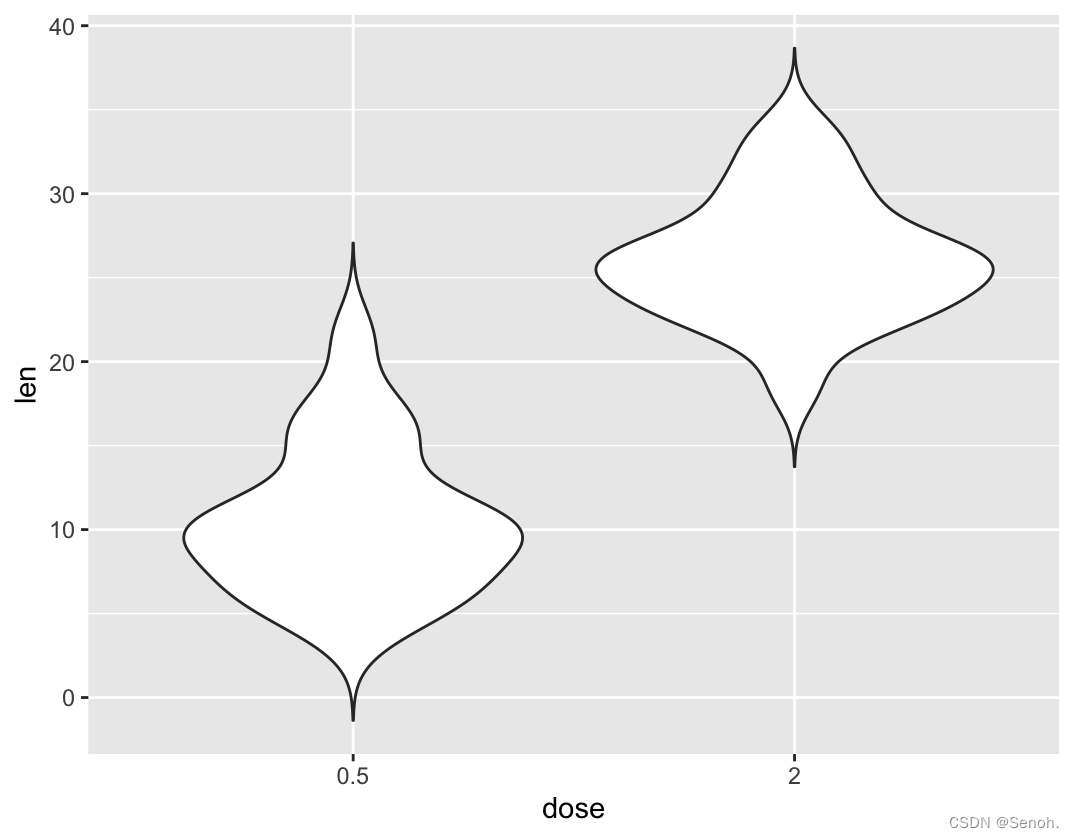
#添加中位值median,均值改mean
p + stat_summary(fun.y=mean, geom="point", shape=23, size=2, color="red")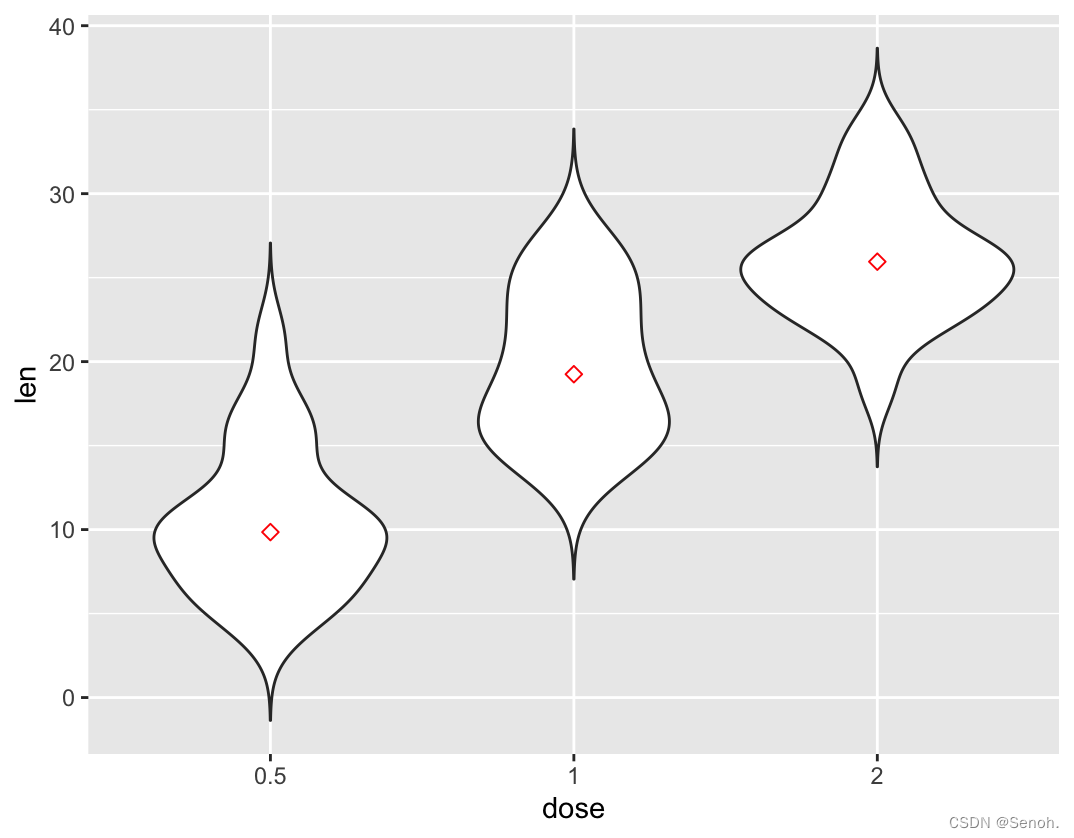
#中位数和四分位数
p + geom_boxplot(width=0.1)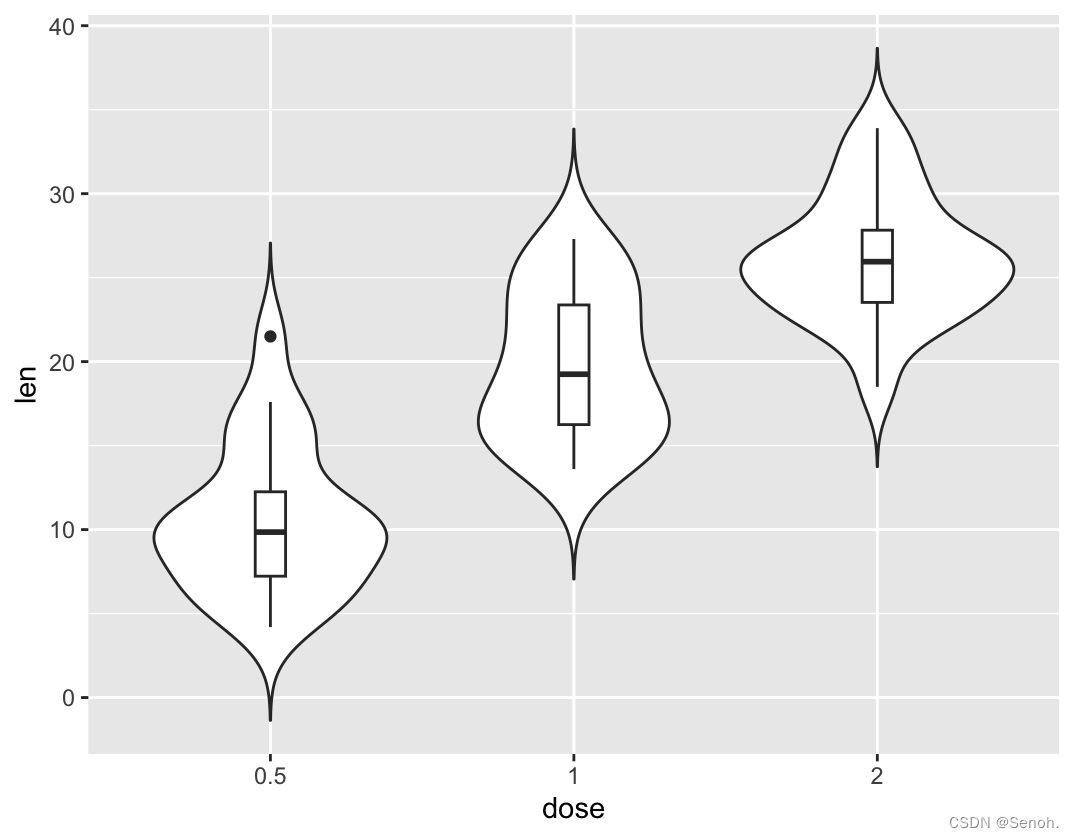
#均值和标准差
p <- ggplot(ToothGrowth, aes(x=dose, y=len)) +
  geom_violin(trim=FALSE)
p + stat_summary(fun.data=mean_sdl, mult=2,
                 geom="pointrange", color="red")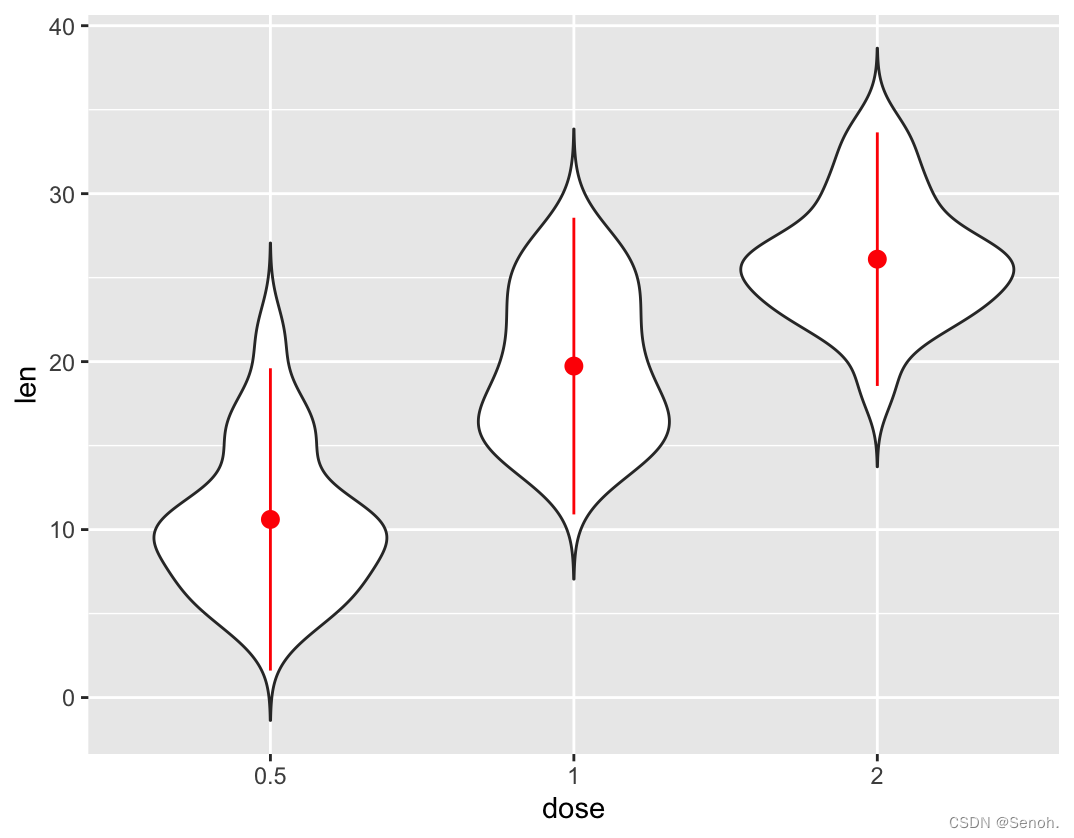
#带点小提琴图
p + geom_dotplot(binaxis='y', stackdir='center', dotsize=1)
#点发散
p + geom_jitter(shape=16, position=position_jitter(0.2))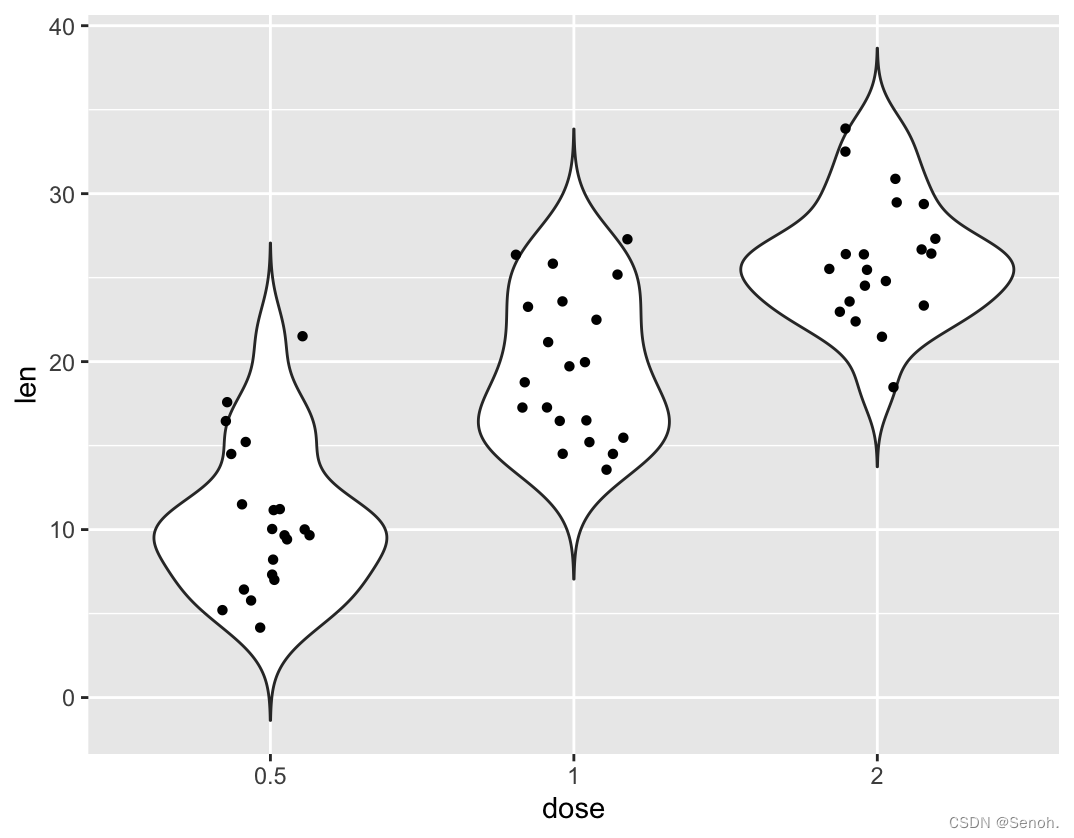
定义颜色的代码跟前两章柱状图箱线图的一样,都对应着线框颜色和填充颜色。
#准备数据
set.seed(1)
n <- 10000
ii <- rbinom(n, 1, 0.5)
data <- rnorm(n, mean = 130, sd = 10) * ii +
  rnorm(n, mean = 80, sd = 5) * (1 - ii)
#柱状图
hist(data, probability = TRUE,
     col = "grey", axes = FALSE,
     main = "", xlab = "",  ylab = "")
axis(1)
#密度线
lines(density(data), lwd = 2, col = "red")
#添加小提琴图
par(new = TRUE)
vioplot(data, horizontal = TRUE,
        yaxt = "n", axes = FALSE,
col = ggsci::pal_npg("nrc",alpha = 0.2)(1)) 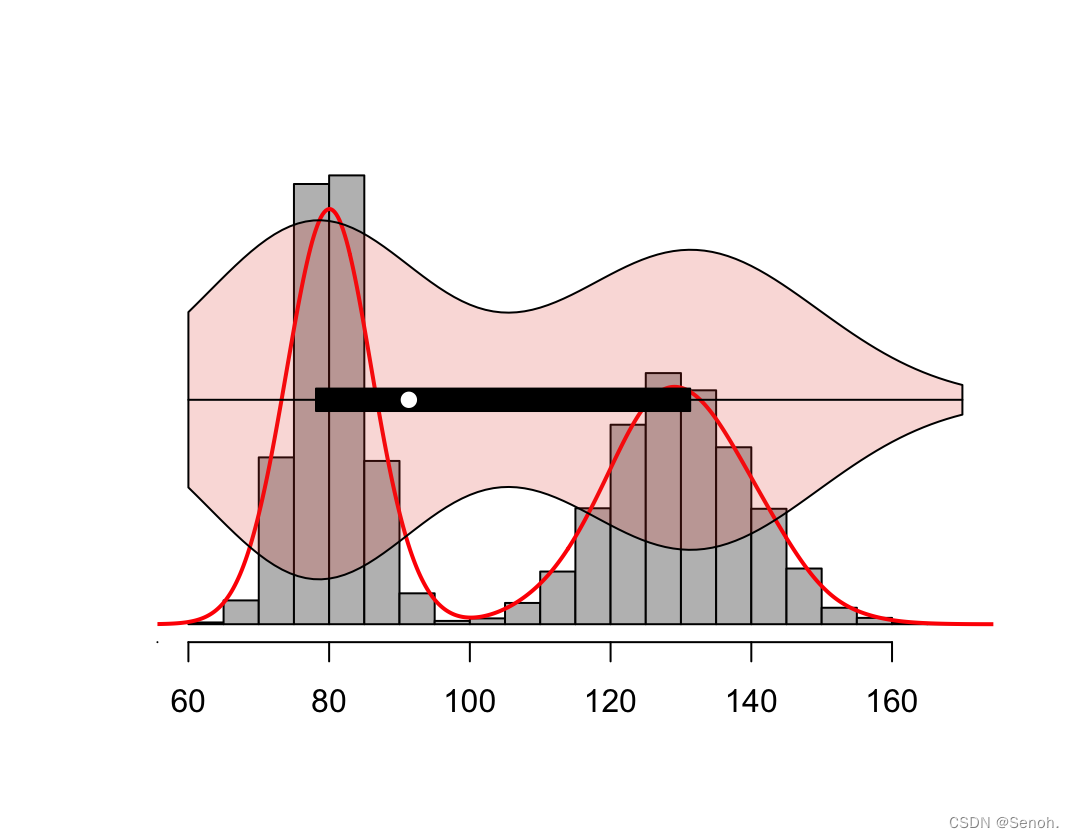
#准备数据,分组
data <- trees
tall <- trees[trees$Height >= 76, ]
small <- trees[trees$Height < 76, ]
#绘图
vioplot(tall, side = "left", plotCentre = "line", col = "#3B4992B2")
vioplot(small, side = "right", plotCentre = "line", col = "#EE0000B2", add = TRUE)
#图例
legend("topleft", legend = c("Tall", "Small"), fill = c("#3B4992B2","#EE0000B2"), cex = 1.25)
#分画布
par(mfrow = c(1, 2))
data <- chickwts

#低到高
medians <- reorder(data$feed, data$weight, median)
#medians <- with(data, reorder(feed, weight, median)) # 也可用这行,效果一样的,下面同理
vioplot(data$weight ~ medians, col = 2:(length(levels(data$feed)) + 1),
        xlab = "", ylab = "Weight", las = 2)
#高到低
medians <- reorder(data$feed, -data$weight, median)
vioplot(data$weight ~ medians, col = 2:(length(levels(data$feed)) + 1),
        xlab = "", ylab = "Weight", las = 2)
library("ggpubr")
library("reshape2")
norcol="#EE0000FF"                    #疾病组
concol="#3B4992FF"                   #正常组

#读取文件
rt=read.table(inputFile,header=T,sep="\t",check.names=F,row.names=1)
x=colnames(rt)[1]
colnames(rt)[1]="Type"

#转换分类矩阵数据
data=melt(rt,id.vars=c("Type"))
colnames(data)=c("Type","Gene","Expression")

#绘图
pdf(file=outFile, width=6, height=5)
p=ggviolin(data, x="Gene", y="Expression", color = "Type",
           ylab="Gene expression",
           xlab="Gene",
           #legend.title=x,
           add.params = list(fill="white"),
           palette = c(concol,norcol),
           width=1, add = "boxplot")
#p=p+rotate_x_text(60)
p1=p+stat_compare_means(aes(group=Type),
                        method="wilcox.test", #可换其他统计方法
                        symnum.args=list(cutpoints = c(0, 0.001, 0.01, 0.05, 1), symbols = c("***", "**", "*", " ")),
                        label = "p.signif")
print(p1)
dev.off()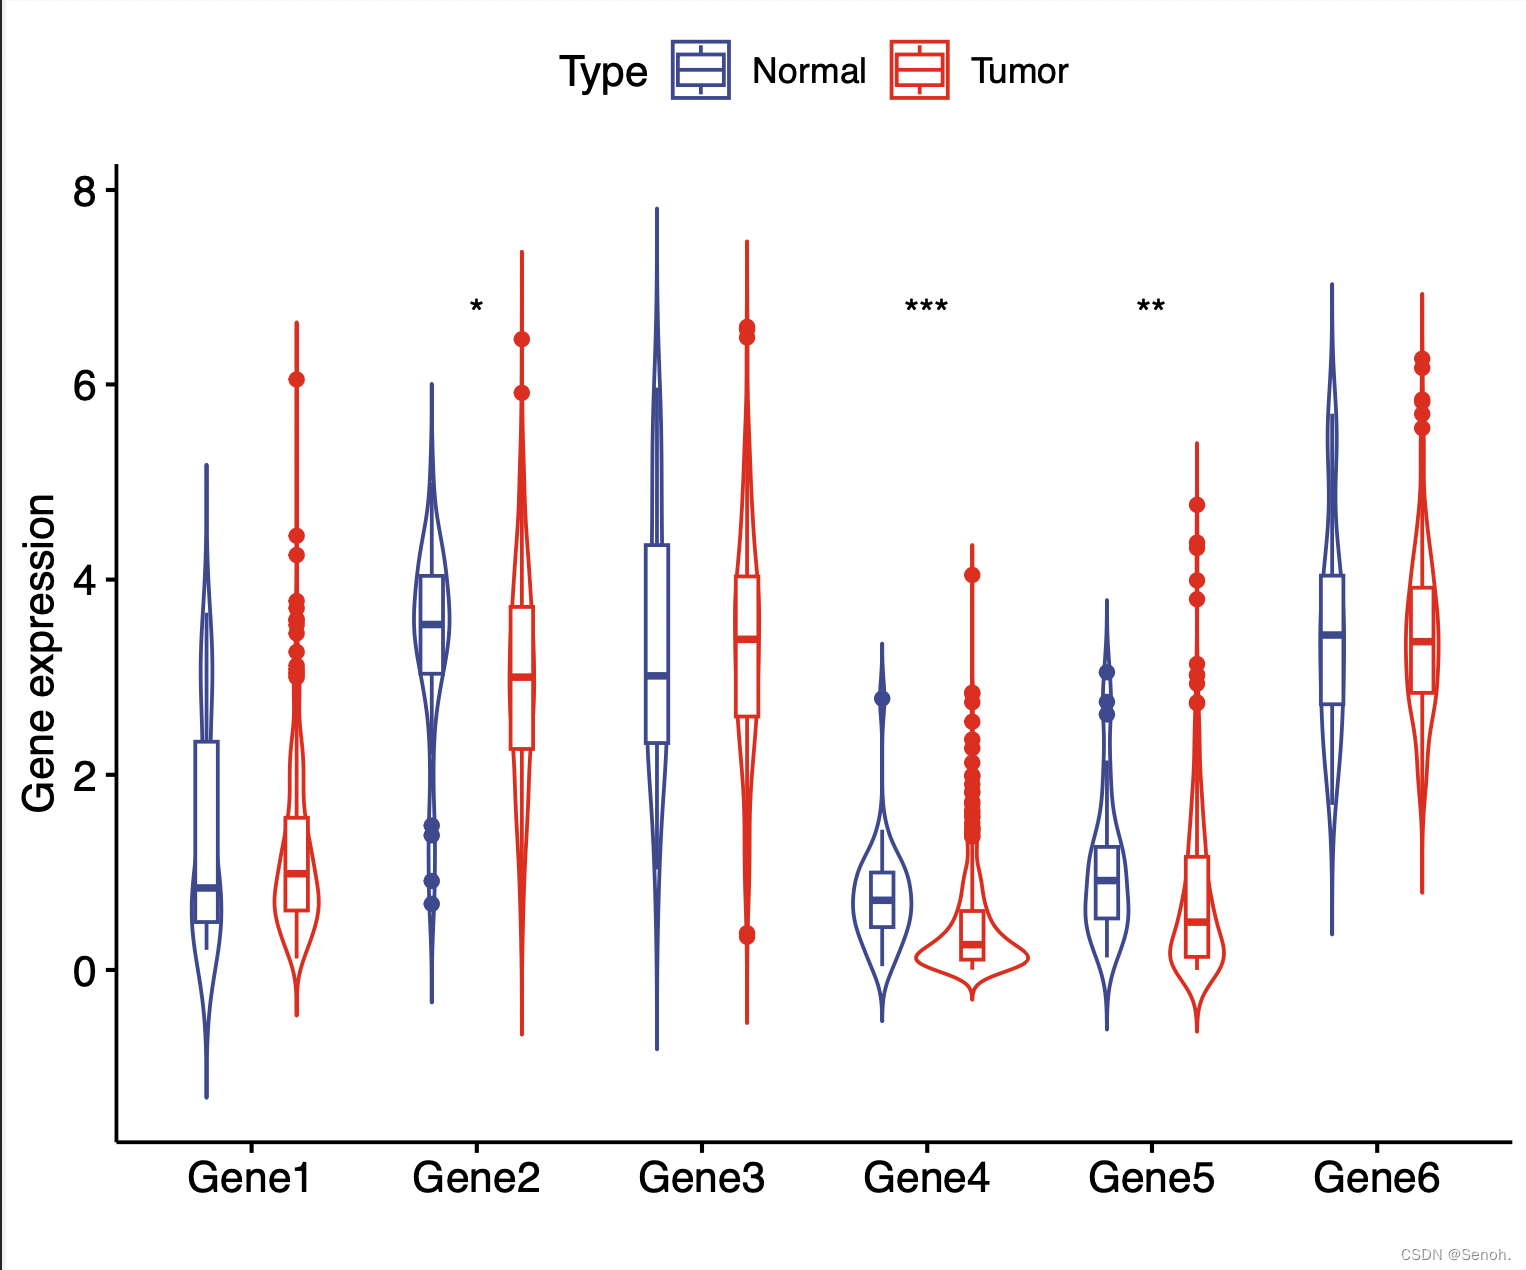
library(ggpubr)
library(ggsci)
ggsci::pal_tron("legacy")(4)
color=c("#FF410DFF","#6EE2FFFF","#F7C530FF","#95CC5EFF")

#读取文件
rt=read.table(inputFile,header=T,sep="\t",check.names=F)
x=colnames(rt)[2]
y=colnames(rt)[3]
colnames(rt)=c("id","Type","Expression")

#设置分组
group=levels(factor(rt$Type))
rt$Type=factor(rt$Type, levels=group)
comp=combn(group,2)
my_comparisons=list()
for(i in 1:ncol(comp)){my_comparisons[[i]]<-comp[,i]}

#绘图
pdf(file=outFile, width=6, height=5)
ggviolin(rt, x="Type", y="Expression", fill = "Type",
         xlab=x, ylab=paste0(y,"  expression"),
         legend.title=x,
         palette = color,
         add = "boxplot", add.params = list(fill="white"))+
#stat_compare_means(comparisons = my_comparisons) #显示具体数值
stat_compare_means(comparisons = my_comparisons,
                   symnum.args=list(cutpoints = c(0, 0.001, 0.01, 0.05, 1),
                                    symbols = c("***", "**", "*", "ns")),
                   label = "p.signif") #显著替换成星号
dev.off()
library(ggplot2)
library(reshape2)
color = c("#FF410DFF","#6EE2FFFF","#F7C530FF","#95CC5EFF")

#读取文件
rt=read.table(inputFile, header=T,sep="\t",check.names=F,row.names=1)
x=colnames(rt)[1]
colnames(rt)[1]="Type"

#计算组间差异
geneSig=c("")
for(gene in colnames(rt)[2:ncol(rt)]){
  rt1=rt[,c(gene,"Type")]
  colnames(rt1)=c("expression","Type")
  p=1
  if(length(levels(factor(rt1$Type)))>2){
    test=kruskal.test(expression ~ Type, data = rt1)
    p=test$p.value
  }else{
    test=wilcox.test(expression ~ Type, data = rt1)
    p=test$p.value
  }
  Sig=ifelse(p<0.001,"***",ifelse(p<0.01,"**",ifelse(p<0.05,"*","")))
  geneSig=c(geneSig,Sig)# 根据p值显著标星号
}
colnames(rt)=paste0(colnames(rt),geneSig)

#转换数据类型
data=melt(rt,id.vars=c("Type"))
colnames(data)=c("Type","Gene","Expression")

#绘图
pdf(file=outFile, width=9, height=5)
p1=ggplot(data,aes(x=Type,
                   y=Expression,
                   fill=Type))+
  guides(fill=guide_legend(title=x))+
  labs(x = x, y = "Gene expression")+ #y轴
  geom_violin()+
  scale_fill_manual(values = color) +  geom_boxplot(width=0.2,position=position_dodge(0.9))+
  facet_wrap(~Gene,nrow =1)+
  theme_bw()+
  theme(axis.text.x = element_text(angle = 45, hjust = 1))
print(p1)
dev.off()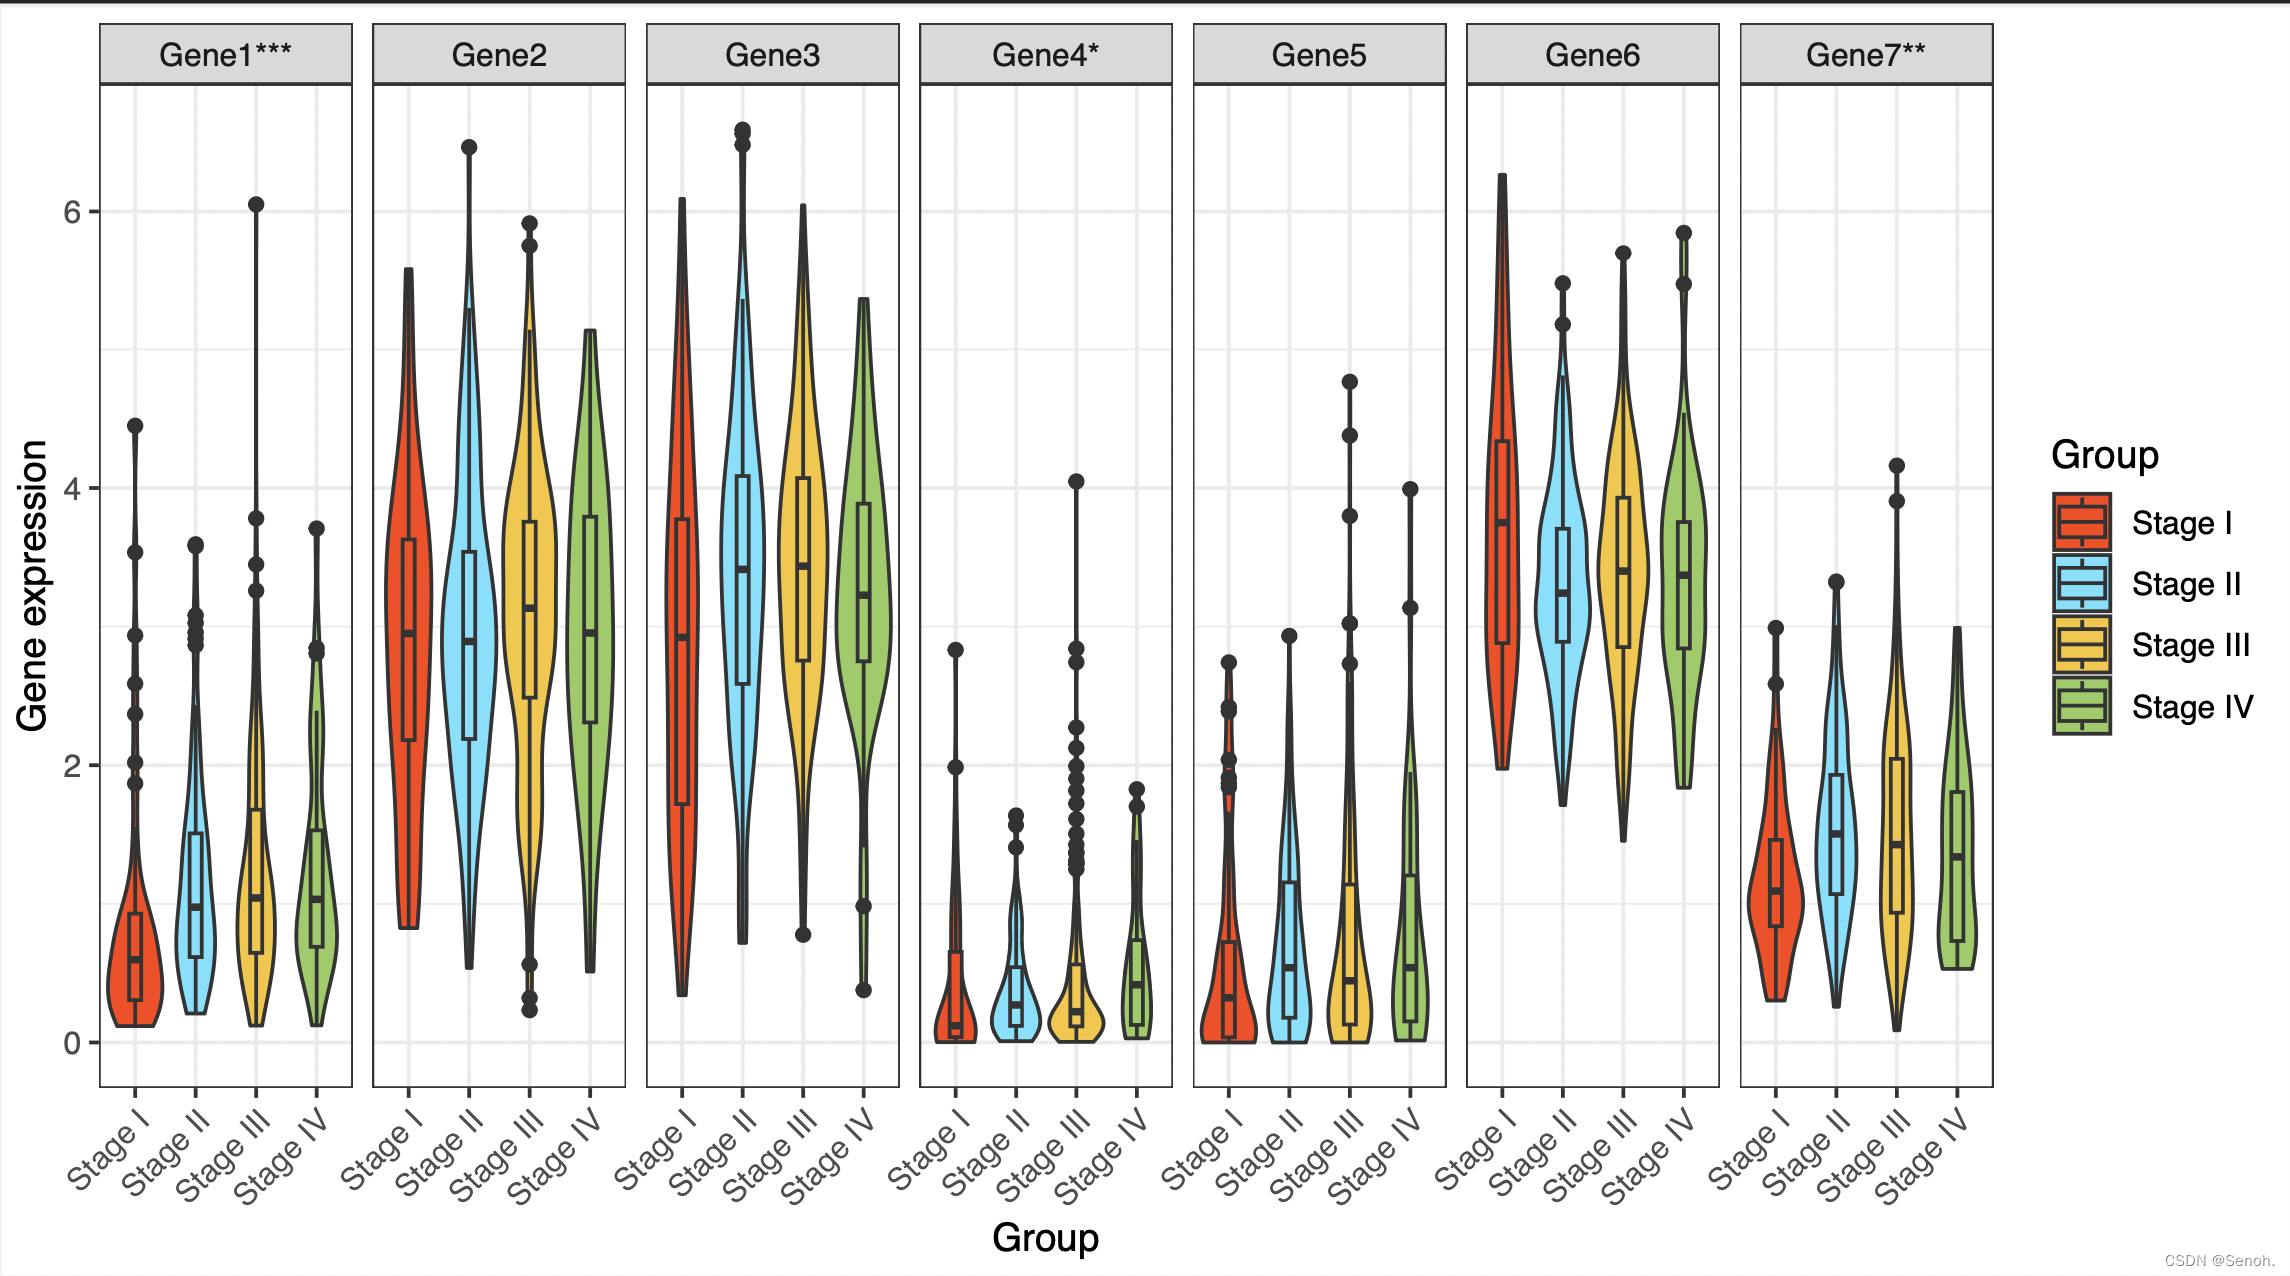
小提琴图和箱线图其实大同小异,都是常用于展示基因组间差异表达,很基础的描述性统计可视化图。和violinplot区分开来,部分代码不同,但是效果和目的一样。每个图都可以自己换线框、填充颜色透明度等,发文不重复。